
In Toolbag 5.01 and previous versions, every Toolbag scene included a Render object in the Scene window. Since the release of Toolbag 5.02, all rendering configurations and settings have been migrated into a dedicated Render window.
Lighting #
The Lighting section of the Render object lets you select your renderer for both the Viewport and the final render image and video outputs. Toolbag currently supports three rendering modes: real-time Raster (default), Hybrid, and interactive Ray Tracing.
Raster #
Raster rendering is a render mode that strikes a balance between speed and visual quality. It’s suitable for quick previews and smooth interactive experiences. While not as physically accurate as ray tracing, it is ideal for scenarios where interactivity and efficiency are paramount.
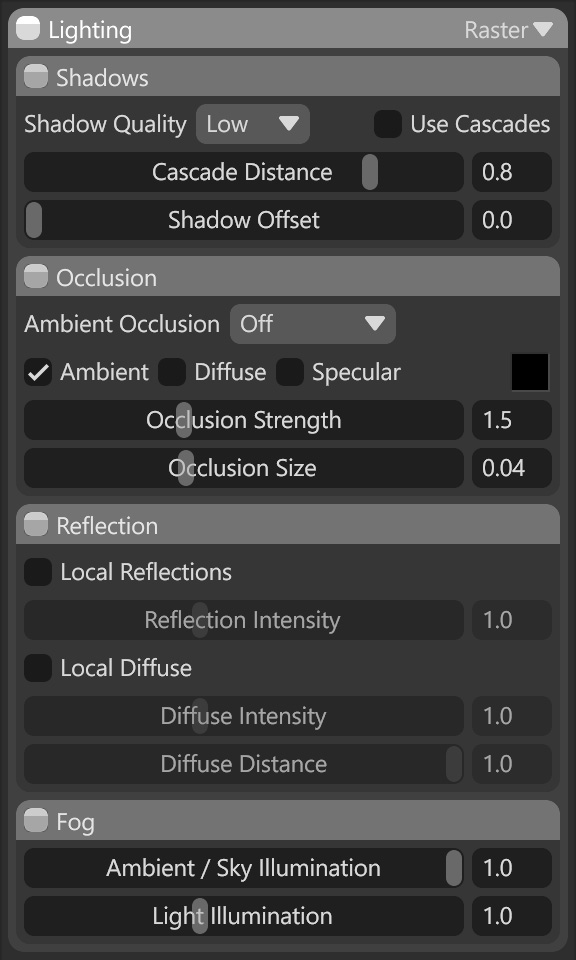
Shadows
In this section, you can adjust shadow quality settings and enable or disable cascade shadows.
| Setting | Description |
|---|---|
| Shadow Quality | Controls the resolution of all shadow maps for improved detail and precision. Higher settings have an adverse effect on performance. |
| Use Cascades | Enables cascading shadows for higher-quality directional lights in large scenes. |
| Cascade Distance | Adjusts how much texture detail is devoted to the near and far areas. Higher values mean more shadow detail for near objects, which is generally good for close-ups. Lower values mean a more even distribution of detail, which is generally good for wider shots. |
Occlusion
Ambient Occlusion (AO) is a post-processing effect that approximates self-shadowing and light occlusion in the cracks and crevices of adjacent surfaces. There are three options to select from to control AO in raster rendering mode:
- Off: No ambient occlusion is generated.
- Screen: This enables screen-spaced AO in your viewports, a simple and performant method of AO generation useful for fast previews and classic game-style renders.
- Ray Tracing: Enables more complex, physically correct occlusion, useful for achieving the highest-quality shadows without enabling the full Ray Tracing render mode.
| Setting | Description |
|---|---|
| Ambient Occlusion | Enables an inter-object light occlusion approximation. This effect only applies to raster renders. |
| Ambient | The occlusion effect darkens diffuse light from the sky background. |
| Diffuse | The occlusion effect darkens diffuse light from all sources. This setting overrides the Ambient option. |
| Specular | The occlusion effect darkens specular light. The occlusion color hue is not used for specular occlusion. |
| AO Color | Sets the color of the ambient occlusion effect. |
| Occlusion Strength | Sets the intensity of the ambient occlusion effect. |
| Occlusion Size (SSAO) | Sets the spread of the ambient occlusion effect. |
| Ray Traced Distance (Ray Traced AO) | Sets the spread of the ambient occlusion effect. |
| Ray Distance (Ray Traced AO) | Controls the ambient occlusion ray length. |
Reflection
In this section, you can adjust local reflection rendering options, which are very useful for achieving greater realism in your final render when using Raster rendering mode.
| Setting | Description |
|---|---|
| Local Reflections | Enables an inter-object light occlusion approximation. This effect only applies to raster renders. |
| Reflection Intensity | Adjusts the brightness of local reflections. |
| Local Diffuse | Enables an approximation of diffuse light scattering between objects. This effect only applies to raster renders. |
| Diffuse Intensity | Adjusts the brightness of local diffuse light. |
| Diffuse Distance | Adjusts the falloff length of local diffuse light. This value is not in scene units but rather a ratio with camera distance. |
Fog
Fog settings determine how a Fog object interacts with light sources, helping to influence and adjust the atmosphere in your render.
| Setting | Description |
|---|---|
| Ambient / Sky Illumination | Mixes between a volumetric medium that is lit by the sky background, and a simple ambient color. |
| Light Illumination | Controls the brightness of omni, spot, and directional light sources in the medium. |
Hybrid #
Hybrid mode combines the Raster renderer’s interactivity and responsiveness with the ray-traced renderer’s image quality and fidelity. It separates the processing of lighting passes such as shadows, global illumination, and reflections, allowing each to be independently denoised. This delivers a smoother, more realistic rendering experience, similar to a game engine.
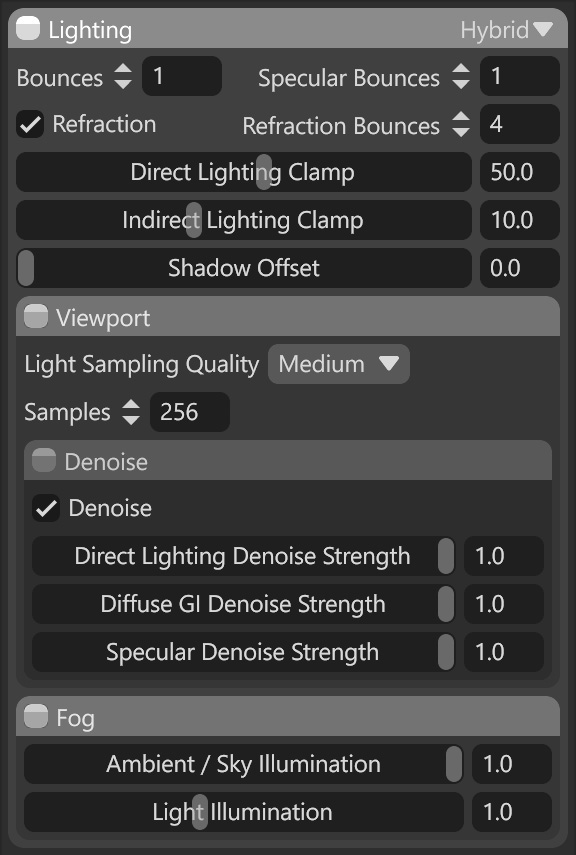
The main settings section controls the behavior and quality of ray tracing in the scene. It defines how many diffuse, specular, and refraction bounces are traced. Increasing these values can improve image quality, but will also reduce performance.
| Setting | Description |
|---|---|
| Bounces | Number of diffuse GI bounces to trace. |
| Specular Bounces | Number of specular reflection bounces to trace. |
| Refraction | Enables ray-traced refraction. |
| Refraction Bounces | Number of specular refraction bounces to trace. |
| Direct Lighting Clamp | Maximum allowed sample direct radiance. Decreasing this value can reduce fireflies, but when set too low, it negatively impacts lighting quality. |
| Indirect Lighting Clamp | Maximum allowed sample indirect radiance. Decreasing this value can reduce fireflies, but when set too low, it negatively impacts lighting quality. |
| Shadow Offset | Adds a small spatial offset between shadows and shadow casters. This can be useful for tweaking shadow artifacts in difficult cases. |
Viewport (Hybrid)
The Viewport section of the Hybrid and Ray Tracing render settings lets you adjust the number of render frames and denoising settings to increase or decrease rendering quality in the viewport.
| Setting | Description |
|---|---|
| Light Sampling Quality | Choose between low-quality sampling with more noise but faster rendering, and high-quality sampling with less noise but slower rendering. |
| Samples | Progressively improves viewport preview quality by accumulating frames over time. |
Denoise Settings
Denoising is a rendering process that helps reduce noise or graininess across multiple frames as light rays accumulate. It uses advanced algorithms to analyze and smooth out pixel-level variations, resulting in cleaner and more visually appealing final images. The Denoise settings help optimize render times and achieve high-quality results without requiring extensive rendering iterations.
| Setting | Description |
|---|---|
| Denoise | Enables Hybrid mode’s denoiser. |
| Direct Lighting Denoise Strength | Intensity of denoising direct illumination. |
| Diffuse GI Denoise Strength | Intensity of denoising diffuse GI. |
| Specular Denoise Strength | Intensity of denoising specular reflection. |
Fog
Fog settings determine how a Fog object interacts with light sources, helping to influence and adjust the atmosphere in your render.
| Setting | Description |
|---|---|
| Ambient / Sky Illumination | Mixes between a volumetric medium that is lit by the sky background, and a simple ambient color. |
| Light Illumination | Controls the brightness of omni, spot, and directional light sources in the medium. |
Ray Tracing #
Ray Tracing is a rendering technique that simulates how light interacts with objects to create realistic and accurate images. It traces the paths of light rays as they bounce off surfaces and interact with materials, creating shadows, reflections, and refractions.
By simulating the behavior of light rays, ray tracing produces visually stunning and physically accurate results, enhancing the overall visual fidelity of rendered scenes.
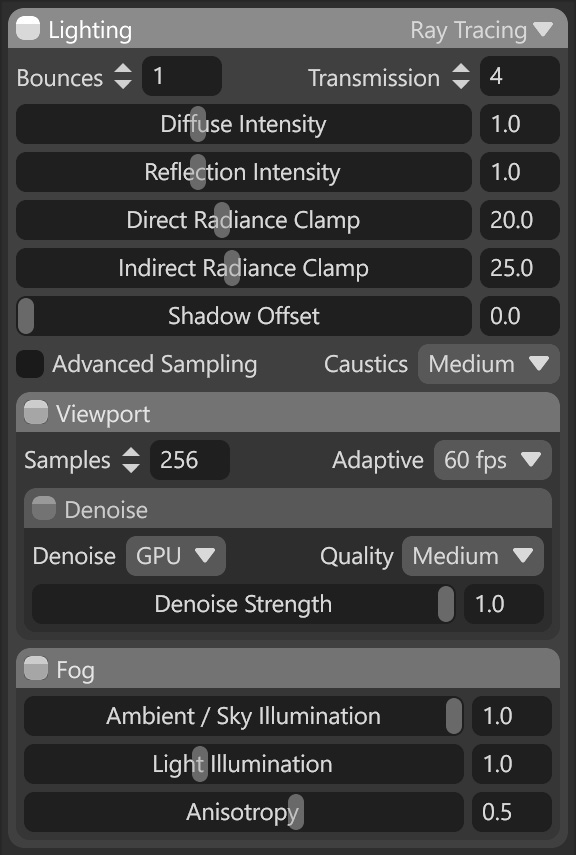
The main settings section controls the behavior and quality of ray tracing in the scene. It defines how many diffuse, specular, and refraction bounces are traced. Increasing these values can improve image quality, but will also reduce performance.
| Setting | Description |
|---|---|
| Bounces | Number of indirect light bounces to trace. |
| Transmission | Number of transmission light bounces to trace. Increasing this value might help if transmissive objects appear too dark. Note: Higher values are recommended if creating realistic refractive materials in your scene, i.e., diamonds, glass, etc. |
| Diffuse Intensity | Intensity of diffuse indirect lighting. |
| Reflection Intensity | Intensity of reflected indirect lighting. |
| Direct Radiance Clamp | Maximum allowed sample direct radiance. Decreasing this value can reduce fireflies, but when set too low, it negatively impacts lighting quality. |
| Indirect Radiance Clamp | Maximum allowed sample direct radiance. Decreasing this value can reduce fireflies, but when set too low, it negatively impacts lighting quality. |
| Indirect Radiance Clamp | Maximum allowed sample indirect radiance. Decreasing this value can reduce fireflies, but when set too lo,w it negatively impacts lighting quality. |
| Shadow Offset | Adds a small spatial offset between shadows and shadow casters. This can be useful for tweaking shadow artifacts in difficult cases. |
| Advanced Light Sampling | Reduces noise in scenes with many lights. Has a moderate impact on render time and viewport performance. |
| Caustic | Quality of the caustic paths that produce bright highlights due to illumination bounced off nearby specular surfaces. Higher-quality caustics may require more samples to converge. |
Viewport (Ray Tracing)
The Viewport section of the Hybrid and Ray Tracing render settings lets you adjust the number of render frames and denoising settings to increase or decrease rendering quality in the viewport.
| Setting | Description |
|---|---|
| Samples | Progressively improves viewport preview quality by accumulating frames over time. |
| Adaptive | Automatically adjusts the number of accumulated samples per frame while trying to maintain the target frame rate. When disabled, only 1 sample is accumulated per frame. |
Denoise Settings
Denoising is a rendering process that helps reduce noise or graininess across multiple frames as light rays accumulate. It uses advanced algorithms to analyze and smooth pixel-level variations, resulting in cleaner, more visually appealing final images. The Denoise settings help optimize render times and achieve high-quality results without requiring extensive rendering iterations.
| Setting | Description |
|---|---|
| Denoise | Noise reduction mode in the viewport preview. GPU mode requires a supported NVIDIA graphics adapter. |
| Quality | Noise reduction quality level in the viewport preview. |
| Denoise Strength | Applies noise reduction in the viewport preview, once several frames have accumulated. |
Fog
Fog settings determine how a Fog object interacts with light sources, helping to influence and adjust the atmosphere in your render.
| Setting | Description |
|---|---|
| Ambient / Sky Illumination | Mixes between a volumetric medium that is lit by the sky background, and a simple ambient color. |
| Light Illumination | Controls the brightness of omni, spot, and directional light sources in the medium. |
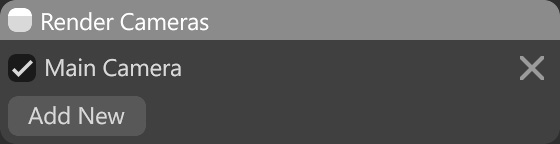
Render Cameras #
You can initiate a batch rendering process of multiple cameras under the Render Cameras menu. Add and enable the cameras you want to render, then begin the rendering process.
| Setting | Description |
|---|---|
| Enable Camera | Enable or disable this camera when rendering screenshots/videos. |
| Delete Camera | Remove this render camera. |
| Add Camera | Create a new camera in the scene and add it to this list. |
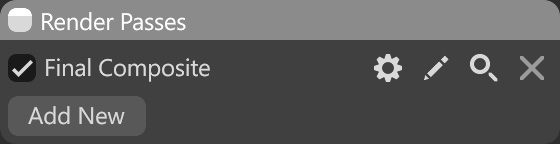
Render Passes #
Toolbag also allows rendering Render Passes, which can be useful for further image editing or compositing. They help isolate the geometry and specific components from other rendering elements for later adjustments and correction in post-processing.
The following image and table are examples of your default Render Passes setup and the options available per render pass.
| Setting | Description |
|---|---|
| Final Composite | Default render pass. |
| Add New | Add an additional render pass for your render Outputs. Note: Once you add a render pass, it will disappear from the Add New list. |
| Parameters ⚙️ | Adjust the extra parameters for this render pass. |
| Open Last Render ✏️ | Opens the last render saved to disk. |
| Preview 🔎 | Preview Preview the last render saved to disk. |
| Remove ❌ | Remove this render pass. |
Common Render Passes #
| Render Pass | Description |
|---|---|
| Final Composite | Renders the final, fully-lit and composited image based on your enabled render mode, render settings, and selected camera settings. You can apply the mesh’s wireframe on top of the render. – Wireframe – Controls the intensity of the wireframe effect. – Wireframe Color – Sets the color of the wireframe effect. |
| Wireframe | Renders only the wireframe view of the meshes. The render will be black if there are no meshes in the camera view. – Wireframe – Controls the intensity of the wireframe effect. – Wireframe Color – Sets the color of the wireframe effect. – Cull Wireframe – Show backfaces when rendering wireframes. |
Geometry Passes #
A Geometry render pass focuses on rendering a scene’s geometric information, such as the normals, positions of objects, or depth of a scene.
| Render Pass | Description |
|---|---|
| Alpha Mask | Renders the black and white mask of the objects in the scene where the background is black and the objects are white. |
| Depth | Renders a depth mask of a scene. Normalization – The method by which depth values will be normalized. Dither – Determines whether or not to use the dither noise to smooth the gradient. |
| Incidence | Renders a scene with applied shading to our models according to the angle formed between the camera and the surface normal. |
| Normals | Renders the normals of the objects in a scene. Mode – The target space (object, tangent, or view) to visualize normals. Flip X, Y, Z – Inverts normals on the X, Y, or Z axis, which means the Red, Green, or blue channel. |
| Position | Renders the position of the objects in a scene. Normalization – The method by which depth values will be normalized. Dither – Determines whether or not to use the dither noise to smooth the gradient. |
IDs Passes #
ID render passes assign unique color values to different objects or materials in the scene.
| Render Pass | Description |
|---|---|
| Material ID | Renders all materials in a scene with unique colors. |
| Object ID | Renders all objects in a scene with unique colors. |
Lighting Render Passes #
Lighting render passes isolate the effect of various light sources and lighting effects applied to the scene.
| Render Pass | Description |
|---|---|
| Ambient Occlusion | Renders only the ambient occlusion detail of the scene. |
| Lighting (Direct) | Renders a combination of diffuse and specular lighting that directly hits the objects in a scene. Direct – Light that hits the object directly. Indirect – Light that bounces (global illumination etc.). Complete – A combination of direct & indirect lighting. Diffuse – Diffuse lighting only. Specular – Specular lighting only. Lighting – A combination of diffuse and specular lighting. |
| Lighting (Indirect) | Renders a combination of diffuse & specular lighting that bounces from the objects in a scene (global illumination etc.). |
| Diffuse (Complete) | Renders all diffuse lighting that bounces from objects and hits the objects directly. |
| Diffuse (Direct) | Renders diffuse lighting that directly hits objects in a scene. |
| Diffuse (Indirect) | Renders diffuse lighting that bounces from the objects in a scene (global illumination, etc.). |
| Specular (Complete) | Renders all specular lighting, that bounces from the objects (global illumination, etc.) and hits the objects directly. |
| Specular (Direct) | Renders specular lighting that hits the objects in a scene directly. |
| Specular (Indirect) | Renders specular lighting that bounces from the objects in a scene (global illumination, etc.). |
Material Value Passes #
A Material Values render pass focuses on rendering material-specific properties, such as albedo, roughness, specular, and other material attributes.
| Setting | Description |
|---|---|
| Albedo | Renders the albedo data from the objects in a scene. Energy Conservation – Considers an object’s reflectivity in albedo calculation, showing the raw albedo value fed to lighting calculation. |
| Emissive | Renders the emissive data from the objects in a scene. |
| Gloss | Renders the gloss data from the objects in a scene. |
| Metalness | Renders the metalness data from the objects in a scene. |
| Reflectivity | Renders the reflectivity data from the objects in a scene. |
| Roughness | Renders the roughness data from the objects in a scene. |
| Transparency | Renders the transparency data from the objects in a scene. |
Output #
Toolbag allows you to render images and videos in a variety of formats. You can choose what to render through the Render settings.
Image #
This section allows you to set up the image output settings.
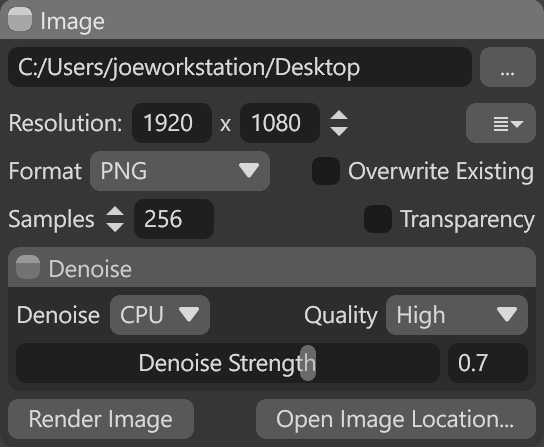
| Setting | Description |
|---|---|
| Output Path | The location to which rendered images will be written. Specify either a directory or file name. |
| Browse | Browse for a file location to save images. |
| Resolution | Sets the width and height of the exported image in pixels. |
| Resolution Presets | Select from a variety of resolution presets. |
| Format | Selects the file type of the exported image. |
| Overwrite Existing | Overwrites existing files with new renders. If this option is disabled, new renders will be given numbered file names. |
| Samples | Sets the number of render samples per pixel. Higher values improve image quality but take longer to render. |
| Transparency | Saves a transparency mask into the alpha channel of the exported image (where supported). |
Denoise #
This section allows you to set up denoise for output images, which is useful for decreasing the noise of rendered images without adding extra samples.
| Setting | Description |
|---|---|
| Denoise | Noise reduction mode. GPU mode requires a supported NVIDIA graphics adapter. |
| Quality | Noise reduction quality level. |
| Denoise Strength | Performs noise reduction in the final image or video frame. This setting only takes effect with ray-traced renders. |
Render Image
After everything is set up, you can render the image.
| Setting | Description |
|---|---|
| Render Image | Generate and save the final image to disk. |
| Open Image Location | Open the folder where the image is saved. |
Video #
In this section, you can set the video output settings.
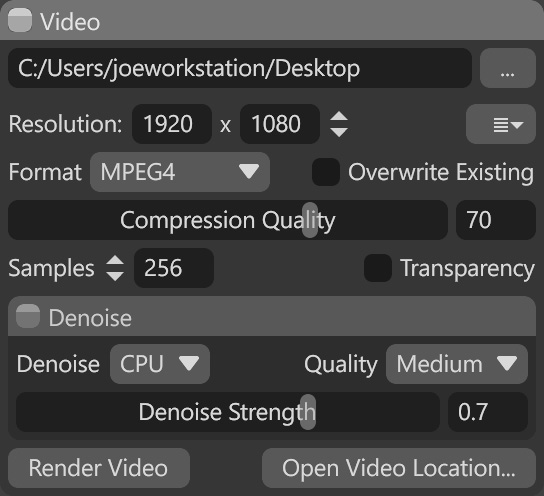
| Setting | Description |
|---|---|
| Output Path | The location to which rendered animations will be written. Specify either a directory or file name. |
| Browse | Browse for a file location to save video files. |
| Resolution | Sets the width and height of the exported animations, in pixels. |
| Resolution Presets | Select from a variety of resolution presets. |
| Format | Selects an output format for the animation. Sequence formats will write a series of still images instead of a single video file. |
| Overwrite Existing | Overwrites existing files with new renders. If this option is disabled, new renders will be given numbered file names. |
| Compression Quality | Video image quality (applies only to compressed video). Higher values will produce larger files that look better. |
| Samples | Sets the number of render samples per pixel. Higher values improve image quality but take longer to render. |
| Transparency | Saves a transparency mask into the alpha channel of the exported image sequence. This is not supported with video files. |
Denoise
This section allows you to set up denoise for video output, which is useful for decreasing the noise of the rendered videos without adding extra samples.
| Setting | Description |
|---|---|
| Denoise | Noise reduction mode. GPU mode requires a supported NVIDIA graphics adapter. |
| Quality | Noise reduction quality level. |
| Denoise Strength | Performs noise reduction in the final image or video frame. This setting only takes effect with ray-traced renders. |
Render Video
After ensuring your video settings are ready, you can render the video.
| Setting | Description |
|---|---|
| Render Video | Generate and save the final video to disk. |
| Open Video Location | Open the folder where the video is saved. |
Watermark #
This section lets you add Toolbag’s watermark to your render and adjust its appearance.
Note: If you are using the trial version of Toolbag, you can’t disable this option.

| Setting | Description |
|---|---|
| Use Watermark | Sets whether the ‘Rendered in Marmoset Toolbag’ watermark is displayed. |
| Hide in Viewport | Sets whether the ‘Rendered in Marmoset Toolbag’ watermark is hidden in the viewport. If “Use Watermark” is enabled the watermark will still be applied to the exported image. |
| Dark | Determines whether to use the light or dark watermark image. The dark watermark image provides better readability with bright scenes. |
| Two-Tone | Sets whether the ‘Rendered in Marmoset Toolbag’ watermark is hidden in the viewport. If “Use Watermark” is enabled, the watermark will still be applied to the exported image. |
| Size | Controls how large the watermark appears. |
| X Position | Sets the horizontal position of the watermark. |
| Y Position | Sets the vertical position of the watermark. |