
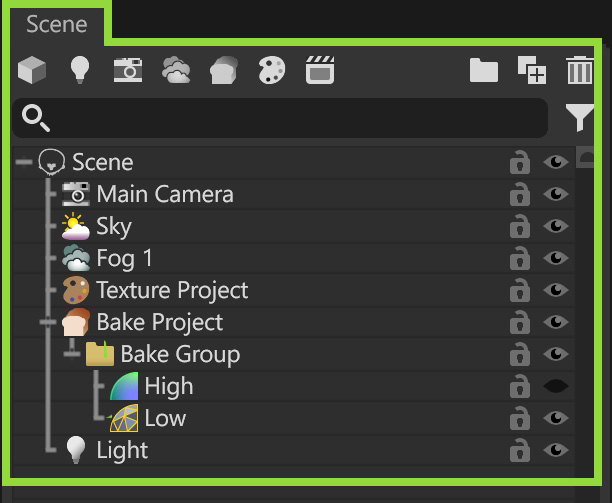
The Scene window contains a hierarchical list of all objects in your Toolbag scene, and is where you’re able to edit the parameters and settings unique to each selected object.
The hierarchical structure allows you to organize your scene as you see fit and manage dependencies and relationships between different scene elements. To adjust an object’s position in the hierarchy, drag-and-drop to rearrange the order, or to parent/unparent certain objects.
Object Types #
Each new Toolbag scene includes a few default items, specifically Scene, Render, Camera, and Sky. These objects are essential for a functional scene and cannot be deleted.
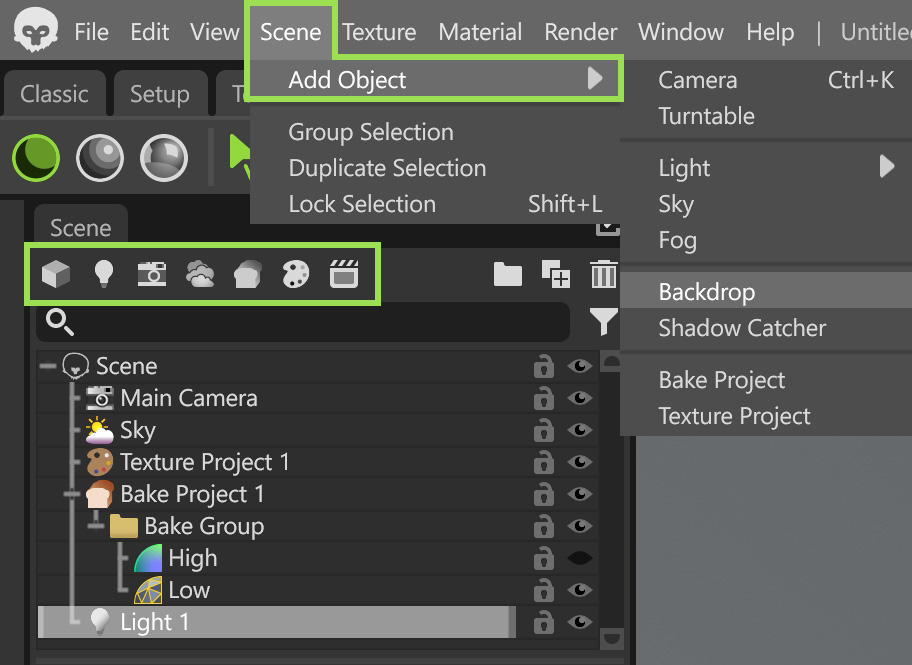
There are two UI options to add a new object to the scene. You can use the row of icons on the Scene window toolbar or the main menu option Scene > Add Object to add from the complete list of object types.
Right-click any object in the scene window to bring up additional options such as copying object settings, exporting, and saving objects to the Library.
| Object Type | Description |
|---|---|
| This allows setting up units and scale settings for the scene. | |
| This object type appears after importing an .fbx, .obj, or other mesh file format. This can be considered a group that references a file on disk and it holds meshes, lights, and other objects that may exist in the imported file. | |
| Determine the render mode(raster or ray tracing), adjust global lighting and shadow settings, and set all image/video output settings. | |
| Edit each camera’s viewport navigation style, lens options, and post effects to control the visual representation of the scene. | |
| Set the HDRI used to generate image-based lighting for your scene and adjust the display style of the visible backdrop. | |
| Creates a 360-degree animation for all child objects, often used to showcase 3D models in motion. | |
| Adds a dynamic light to your scene with different light types available, such as Spot, Directional, and Omni. | |
| Adds a fog effect to the scene with adjustable settings like density, color, and distance. | |
| Adds a custom background image to the scene by parenting it to a selected camera. This image overrides the global backdrop display mode only for the camera it’s parented to. | |
| Creates an invisible floor object in the scene that receives realistic and accurate cast shadows from 3D meshes in the scene. | |
| This object holds the model references and all settings used to generate (“bake”) texture maps from the lighting information on 3D models in your scene. Learn more on baking in Toolbag. | |
| This object holds the material references and all input and output controls for painting and generating custom materials on the 3D models in your scene. Learn more on texturing in Toolbag. |
Scene Toolbar #
The toolbar of the Scene window provides an easy way to add the most common object types to the scene, or organize the existing ones.

| Action | Description |
|---|---|
| Import Model | Opens the file browser and allows you to import a model into the scene. |
| New Light | Adds a new Light object to the scene. |
| New Camera | Adds a new Camera object to the scene. |
| New Fog | Adds a new Fog object to the scene. |
| New Bake Project | Adds a new Bake Project object to the scene. |
| New Texture Project | Adds a new Texture Project object to the scene. |
| Group Selection | Create a new group of the selected objects. |
| Duplicate Selection | Duplicates the selected objects. |
| Delete Selection | Deletes the selected objects. |
Scene Search #
Introduced in Toolbag 5.02, the Scene window includes a Search Bar to find objects in the scene quickly. You can search for objects by words or filter them by type using the filter button on the right of the search bar.

Scene Scale & Units #
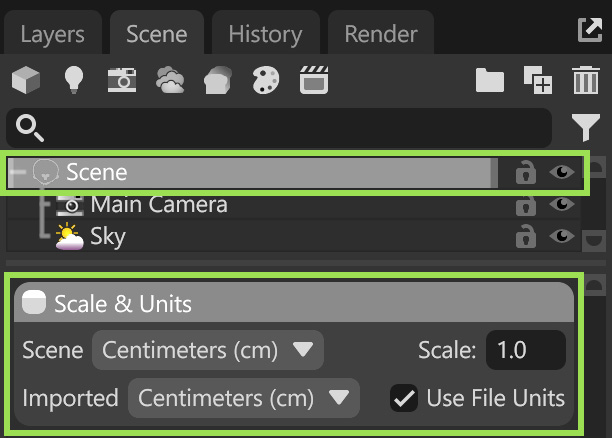
Selecting the Scene object in the hierarchy reveals options to configure units and scale settings. Given the lighting modes and shading models’ physical accuracy in Toolbag, adjusting these settings is an important step to ensure your content renders as you intend.
Toolbag has two unit settings to consider: Scene and Imported units of measurement.

| Setting | Description |
|---|---|
| Scene | Sets the scene’s units of measurement. For example, if set to meters, a light positioned at 1,0,0 would be 1 meter from the origin of your scene. Generally, keeping this setting the same as the imported units is recommended. Adjusting this setting will not scale the content; it will simply convert units. |
| Scale | A custom scale factor that applies to all measurements in this scene. |
| Imported | New files (such as meshes) will be treated as though they were authored using this unit of measurement upon import. This setting is ignored if “Use File Units” is enabled and the imported file has available unit data. If you’ve set the scale in your modeling app to centimeters (cm), it’s also important to set it to centimeters (cm) in Toolbag. Adjusting this setting will also scale your content. |
| Use File Units | Use unit information in imported files for proper unit conversion upon import. Disable this to override file units with the “Imported” unit settings. |
Object Visibility & Locking #
Click the eye icon to toggle the visibility of scene objects, or hold down LMB and swipe through the eye icons to toggle visibility for multiple objects quickly.
The lock icon freezes objects to prevent unintended changes while working on other elements.
Scale & Units #
Selecting the Scene object in the hierarchy reveals options to configure units and scale settings. Due to the physical accuracy of the lighting modes and shading models available in Toolbag, adjusting these settings are an important step for making sure your content renders as you intend.
Toolbag has two unit settings that should be considered: Scene and Imported units of measurement.
| Setting | Description |
|---|---|
| Scene | Set the scene’s units of measurement. For example, if set to meters, a light positioned at 1,0,0 would be 1 meter from the origin of your scene. Generally, keeping this setting the same as the imported units is recommended. Adjusting this setting will not scale the content; it will simply convert units. |
| Scale | A custom scale factor that applies to all measurements in this scene. |
| Imported | New files (such as meshes) will be treated as though they were authored using this unit of measurement upon import. This setting is ignored if “Use File Units” is enabled and the imported file has available unit data. If you’ve set the scale in your modeling app to centimeters (cm), it’s also important to set it to centimeters (cm) in Toolbag. Adjusting this setting will also scale your content. |
| Use File Units | Use unit information in imported files for proper unit conversion upon import. Disable this to override file units with the “Imported” unit settings. |
3D Transform #
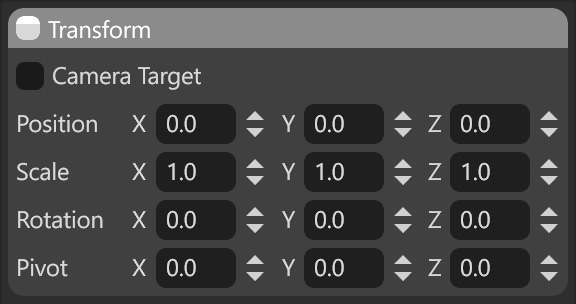
Each object type that can be positioned in the Viewport includes a section of adjustable Transform settings.
| Setting | Description |
|---|---|
| Camera Target | Primarily used for following a point with an animated camera. Set an object (mesh, group, etc.) for the camera to point at, and as the camera is animated, it will follow the target object. |
| Position | The X, Y, and Z coordinates in 3D space. |
| Scale | The scale along the X, Y, and Z axis. |
| Rotation | Rotation around the X, Y, and Z axes. |
| Pivot | The X, Y, and Z coordinates of the object’s pivot in 3D space. |