Toolbag’s camera system is designed to simulate the behavior of real-world cameras, allowing you to control settings like Depth of Field and Field of View similarly to how you would in real life.
Camera Object #
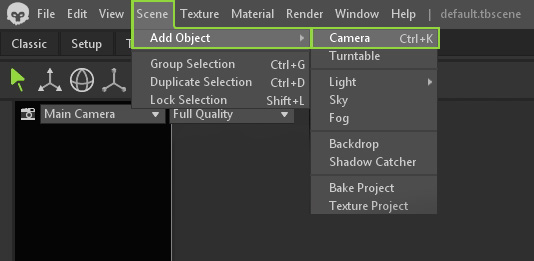
Each scene has a Main Camera object by default, found in the Scene hierarchy. To create more cameras, press Ctrl+K on your keyboard or add one via the Scene menu > Add Object > Camera.
Camera Settings #
Control #
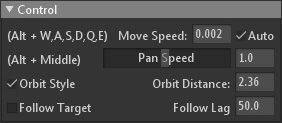
The Control menu lets you adjust the camera’s behavior during animated sequences. Adjusting these settings is relevant to video renders only.
| Setting | Description |
|---|---|
| (Alt + W, A, S, D, Q, E) | Use these controls to move the camera forward, left, back, right, up, and down. |
| Move Speed | If “Auto” is unchecked, this controls how fast the camera moves through the scene when using the keyboard controls. For complex environments, it may be helpful to set this value manually. |
| Move Speed Auto | When enabled, the camera move speed is determined automatically based on scene size. It can be helpful to disable this for complex environments and set the move speed manually. |
| (Alt + Middle) | Use these controls to pan the camera. |
| Pan Speed | Controls how fast the camera pans through the scene. For complex environments, it can be helpful to set this value manually. |
| Pan Speed Auto | When checked, the camera pan speed is determined automatically based on scene size. Disabling this and manually setting the pan speed for complex environments can be helpful. |
| Orbit Style | When enabled, the camera will rotate around a point in the scene. When disabled, the camera will be free-look or first-person shooter-style. |
| Orbit Distance | Sets the distance from the camera to its rotation point. Press Ctrl+F to set the orbit distance to the center of the currently selected object, and Shift+Ctrl+F to set it to the scene’s center. This setting does not apply when the orbit style is disabled. |
| Follow Target | Continually points the camera to the current target object, if present. |
| Follow Lag | Specifies how closely the camera follows the target object. |
Limits #
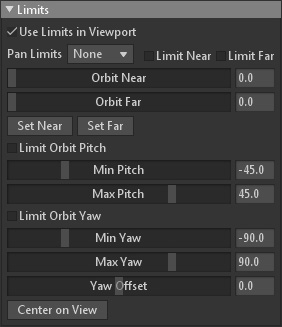
You can set Limits to a camera object to limit how others view your model on the web. This is relevant when the scene is uploaded via the Marmoset Viewer.
| Setting | Description |
|---|---|
| Use Limits in Viewport | Use limit settings to constrain camera motion in the Toolbag viewport. Active limits always export to Marmoset Viewer regardless of this setting. |
| Pan Limits | Constraints camera panning either completely or to vertical motion only. |
| Limit Near | Enforces a minimum orbit distance, specified by the “Orbit Near” value. |
| Limit Far | Enforces a maximum orbit distance, specified by the “Orbit Far” value. |
| Orbit Near | Specifies the minimum orbit distance. |
| Orbit Far | Sets the “Orbit Near” value to the current orbit distance. |
| Set Far | Sets the “Orbit Far” value to the current orbit distance. |
| Set Near | Sets the “Orbit Near” value to the current orbit distance. |
| Limit Orbit Pitch | Enforces a minimum and maximum pitch angle, or vertical orbit, specified by the “Min Pitch” and “Max Pitch” values. Pitch limits may also be adjusted directly in the viewport. Hold the Ctrl key to adjust both minimum and maximum limits simultaneously. |
| Min Pitch | The minimum pitch angle, or vertical orbit, in degrees. |
| Max Pitch | The maximum pitch angle, or vertical orbit, in degrees. |
| Limit Orbit Yaw | Enforces a minimum and maximum yaw angle, or horizontal orbit, specified by the “Min Yaw” and “Max Yaw” values. Yaw limits may also be adjusted directly in the viewport. Hold the Ctrl key to adjust both minimum and maximum limits simultaneously. |
| Min Yaw | The minimum pitch angle, or vertical orbit, in degrees. |
| Max Yaw | The maximum yaw angle, or horizontal orbit, in degrees. |
| Yaw Offset | Shifts the yaw values by a constant offset, in degrees. This is useful for easily re-orienting the yaw range. |
| Center on View | Centers the current yaw and pitch ranges around the current camera orientation. This is useful for easily re-orienting the pitch and yaw ranges to frame a chosen camera position. |
Lens #
Below are the settings found under the Camera Lens menu.
| Setting | Description |
|---|---|
| Mode | Determines which camera type to use, perspective or orthographic. |
| Field of View (Perspective) | Controls how much of the scene is visible, by setting the vertical field of view of the lens (in degrees). Lowering the value provides a narrower view, while increasing the value provides a wider view. |
| Scale (Orthographic) | Controls how much of the scene is visible by setting the scale of the camera. Decreasing zooms into the scene, while increasing zooms out. |
| Near Plane | Adjusts the automatic near clipping plane. Lower values can be useful to fix false clipping that can occur with nearby objects in large scenes. Note that values near zero may cause rendering artifacts in distant or intersecting objects. |
| Safe Frame | Previews the region of the viewport that will be present in exported screenshots and videos. |
| Frame Opacity | Sets the opacity of the safe frame. |
Focus #
The Depth of Field setting’s behavior is based on the functionality of a real-life camera’s aperture settings. It determines the distance between close and far objects and adjusts the sharpness and blurriness according to the set focal length. Lower focal lengths equate to more blur and defocus in the image.
Toolbag has two different DoF modes:
- Post Effect: This is raster rendering-based, meaning it is not physically correct. However, it is the faster alternative, making it a good choice for quick video and preview renders, creates less noise, and is much less demanding on performance. Because it is much simpler than Ray Tracing DoF, it renders transparent objects with incorrect blur and may include other artifacts.
- Ray Traced: This mode is physically correct, making it the best option to achieve the highest quality DoF. It is much more demanding on performance and requires enabling Ray Tracing mode. It also generates a lot of noise, which may require additional samples and denoising to resolve.
To learn more about how these DoF settings work, please refer to our Depth of Field quick guide.
| Setting | Description |
|---|---|
| Depth of Field | Enables the depth of field effect, which blurs areas in front or behind the focal point. This setting has an adverse effect on performance. |
| Sticky Focus | Enables the sticky focus feature, which maintains the focus point after the camera is re-positioned. |
| Focal Length | The ratio of focal length to aperture diameter. Lower numbers give more defocus. |
| Focus Distance | Determines the location of the focal point in relation to the camera. This distance can also be set by middle-clicking on an object in the viewport. |
| Focus Tool | Engages the focus tool, which allows you to click a point on the screen to set the focus distance. |
| Anamorphic Bokeh Ratio | Horizontal distortion ratio for simulating anamorphic lens bokeh. |
| Aperture | Determines the aperture shape, which controls the appearance of the out-of-focus highlights and lens flares. New shapes can be created and loaded as well. |
| Load Aperture | Load a custom aperture shape that controls the out-of-focus highlights and lens flares. |
| Aperture Rotation | Sets the direction of the aperture shape for both out-of-focus highlights and lens flares. |
Flare
The lens flare effect happens when light enters a camera lens, creating bright streaks or halos in the picture. Adding extra light effects around the light sources makes the image or video look more dramatic and interesting.
The Lens Flare effect in Toolbag accurately replicates how light interacts with lens elements using an advanced effect modeled on the flares created from complex, real-world optical designs.
Lens Flares can be customized to preference, with adjustments available individually per light and globally per camera. Below, we’ll look at where you’ll find these settings and how to make the most of them.
To edit an individual light’s lens flare, select the Light object in the scene, enable Cast Lens Flare, and tweak its strength. After deciding which lights will cast lens flares, select the Camera object of your choice and look to the Flare and Focus sections of Lens settings to control the global aesthetic of the flares generated.

| Setting | Description |
|---|---|
| Strength | Sets the intensity of the lens flare effect. |
| Coating Color | Simulates a thin surface layer on the lens system, changing the color and appearance of lens flares. |
| Size | Sets the size of the individual flares or “ghosts”. |
Changing the Aperture shape in the Focus section offers more room for creativity, allowing you to mimic specific bokeh and flare effects you may have in mind. Aperture shapes are available for your desired lens flare effect, such as circles, hearts, and multi-sided rings, and you can even load a custom aperture shape.
Motion Blur #
Motion blur occurs when the camera captures the subject in motion, causing a streaking or smearing effect. It’s commonly used to convey a sense of speed, action, or dynamic movement.
Motion blur is an important part of creating convincing-looking animations, and can even be taken advantage of to render in-action still images. It works by averaging multiple frames together and automatically reduces rendering samples proportionally to blur samples, which means that render times should not be affected.
Note: Motion Blur is viewable in final video renders only; it can not currently be previewed in the viewport.
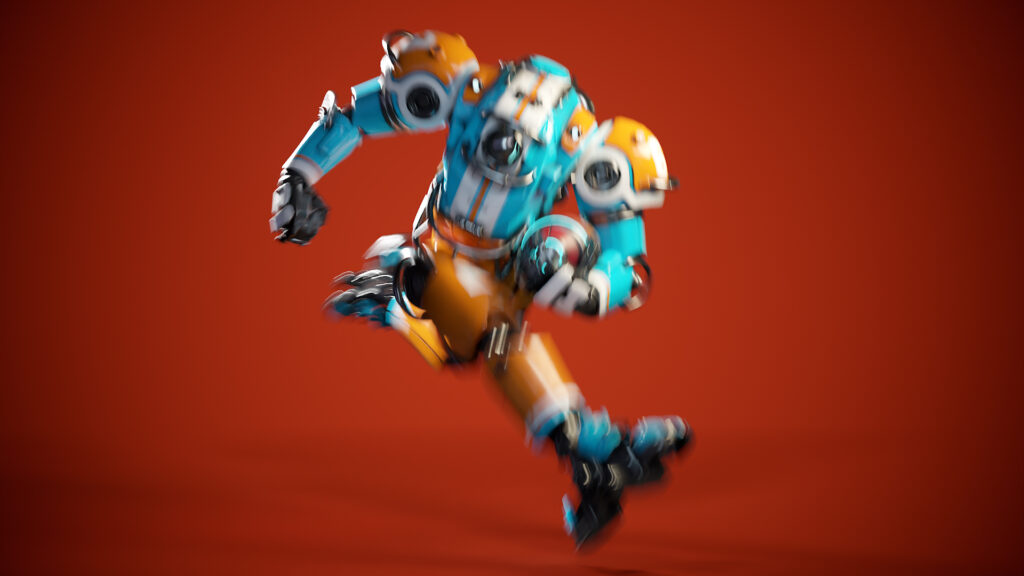
Adjusting the shutter speed dial determines the amount of blur, defined by fractions of a second. Smaller numbers (slower shutter speeds) will produce a more exaggerated blur. Generally speaking, a shutter speed twice as fast as the frame rate will produce a natural blur. This means for 24 and 30 FPS, you would want to use 1/50 and 1/60, respectively. Using a faster shutter speed may be appropriate for scenes with fast action, and using a slower shutter speed can produce a dream-like appearance.
To learn more about using Motion blur, check out our Motion Blur quick guide.
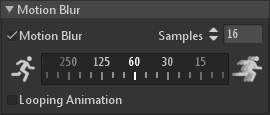
| Setting | Description |
|---|---|
| Motion Blur | Renders a motion blur effect for final render animations and stills. |
| Samples | Controls the quality of the motion blur. More samples result in smoother blur but longer renders. |
| Shutter Speed | Determines the exposure time, affecting the magnitude of the blur. Shutter speed on a camera is typically represented in fractions of a second, ie: 1/60, 1/120, 1/250, etc. |
| Looping Animation | Allows the last animation frame to return to the first frame for motion blur. This option works best for looping animations. |
Distortion #
You can add different distortion effects based on real camera lenses for further realism in your renders.
| Setting | Description |
|---|---|
| Barrel / Pincushion | Controls the type and intensity of the geometric distortion effect. A value of 0 equates to no distortion, values lower than 0 equate to barrel or fisheye-type distortion, and values higher than 0 equate to pincushion-type distortion. |
| Chromatic Aberration | Sets the intensity of the chromatic aberration effect, which simulates how different colored light waves converge at different points, resulting in color fringing towards the edges of the frame. |
| Red | Sets the fringe offset for the red channel. |
| Green | Sets the fringe offset for the green channel. |
| Blue | Sets the fringe offset for the blue channel. |
Post Effect #
The Camera object provides various post effect options to work with during the final stages of your project. These include various tone mapping settings and adjustable curves.
Presets
Choose a pre-made post effect preset or save your own after making adjustments to your liking.
| Setting | Description |
|---|---|
| Load | Loads a post effect preset file. |
| Save | Saves a post effect preset file. |
| Presets | Use to switch between a variety of post effect presets. Save a preset file to /data/post/, and it will appear in the preset list the next time Toolbag is opened. |
Color
Here, you can adjust the Tone Mapping settings. These settings resemble the most common settings found in photo editing apps, like Exposure, Contrast, Saturation, Clarity, and more.
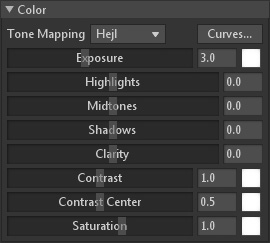
| Setting | Description |
|---|---|
| Tone Mapping | Sets the method used to map high-dynamic-range values into low-dynamic range color space. |
| Curves | Opens the curve editor, to manipulate the contrast of the render on a per-channel basis. |
| Exposure | Sets the brightness of the render. |
| Exposure Color | Sets the color and intensity of the exposure effect. |
| Highlights | Sets the brightness point for the brightest values. Increase to make the highlights brighter and decrease to recover clipped detail. |
| Midtones | Sets the brightness point for the middle values. |
| Shadows | Sets the brightness point for the darkest values. Increase to recover details in the shadows and decrease to crush the blacks. |
| Clarity | Sets the level of micro-contrast. Increase to enhance details and decrease to soften the render. |
| Contrast | Sets the disparity of value between light and dark. |
| Contrast Color | Sets the color and intensity of the contrast effect. |
| Contrast Center | Sets the middle point of the contrast curve. As contrast is increased, values greater than this “center” value get brighter, while values less than “center” get darker. |
| Contrast Center Color | Sets the color and intensity of the contrast center effect. |
| Saturation | Controls the vibrancy of color in the rendered image. |
| Saturation Color | Sets the color and intensity of the saturation effect. |
Sharpen
You can increase the Sharpen effect to enhance the sharpness and detail of your render.
Note: High Sharpen values may cause artifacts on your render.

| Setting | Description |
|---|---|
| Strength | Sets the intensity of the sharpening effect, which increases the contrast of fine details to enhance acutance. |
| Limit | Controls the maximum allowable amount of sharpen. Lower values will prevent major contrast alterations to the image in some cases. |
Bloom
Bloom adds a soft, glowing halo around bright areas in a scene. It simulates the way light scatters and creates a radiant aura.

| Setting | Description |
|---|---|
| Brightness | Sets the intensity of the bloom effect, which blurs the rendered image, and then adds it on top of the original image to simulate the glow from bright light sources (or Vaseline on a camera lens). |
| Color | Sets the color and intensity of the bloom effect. |
| Size | Sets the radius of the blur component of the bloom effect. |
Vignette
The vignette effect darkens an image’s borders, helping draw attention to the center.
| Setting | Description |
|---|---|
| Strength | Sets the intensity of the vignette effect, which darkens the edges of the frame. |
| Color | Sets the color and intensity of the vignette effect. |
| Softness | Sets how harsh or smooth the falloff of the vignette effect appears. |
Grain
In traditional film photography, grain is the appearance of noise in a developed photograph caused by random patterns of tiny silver halide particles in the film that did not receive enough light during exposure. Film with a higher ISO is more sensitive to light, allowing for faster shutter speeds but a greater potential for grain appearance. In digital photography, grain (mostly called ‘noise’) produces a similar effect; however, digital grain comprises colored pixels and creates a sharper-looking result.
When working with animations, Grain randomizes at each frame, producing an organic effect similar to film grain and digital noise from real-world cameras. There is also a Dirt effect that adds an extra layer of random scratches and stains on the render with controls for density and scale. You can choose one of two grain styles, Film or Digital, and adjust the coarseness of the effect.
The Animated Preview option will help to see your grain effect in the viewport before rendering. Read our Realistic Camera Grain quick guide to learn more about Grain in Toolbag.
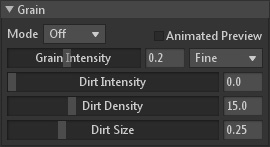
| Setting | Description |
|---|---|
| Mode | Sets the style of grain. |
| Animated Preview | Toggles randomized preview of the grain effect. |
| Grain Intensity | Sets the strength of the grain effect. |
| Tiling Mode | Sets the texture or coarseness of the grain effect. |
| Dirt Intensity | Sets the overall opacity of the scratches and stains. |
| Dirt Density | Controls the amount of scratches and stains visible in each frame. |
| Dirt Size | Controls the size of scratches and stains. |

