
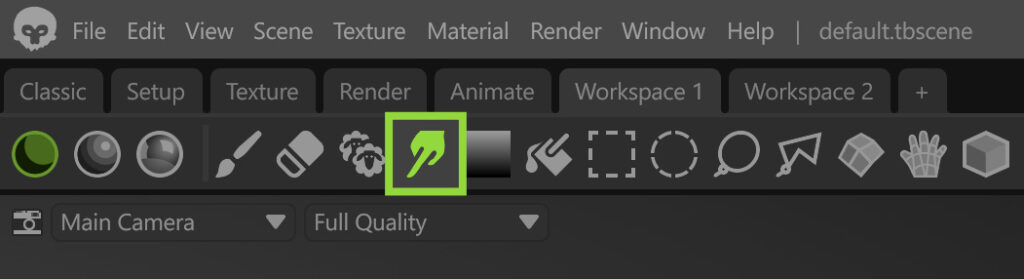
The Smudge Tool is used to manually blend and push texture values across a model’s surface. It does not add new values; instead, it blends texture data along the brush stroke. You can find the Smudge tool in the Toolbar when a Paint layer is selected, alongside other painting tools such as Paint/Erase.
The Smudge tool is mainly used to refine masks and texture maps by softening hard edges, blending transitions, and breaking up procedural patterns that are difficult to control with settings alone. It is especially useful for guiding texture flow to better follow surface shapes and for smoothing transitions so materials feel more natural. It can also be used to create creative effects, such as simulating molten or smeared materials.
To use the Smudge tool, select the texture or mask you want to edit, add a Paint layer on top of it, choose the Smudge tool, and paint directly on the model in the viewport. You can adjust the Brush settings to control the strength of the smudge effect.
Smudge Settings #
The Smudge Settings section controls how the Smudge tool interacts with texture data, including how far values are pushed by each stroke, which surface areas are affected, and which layers are used as the source for smudging.
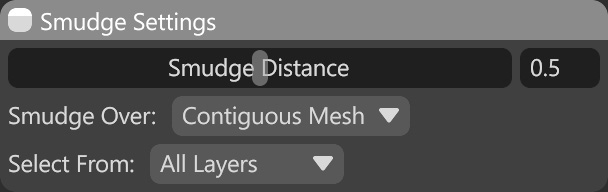
| Setting | Description |
|---|---|
| Smudge Distance | Controls how far texture values are displaced along the brush stroke, affecting the strength and reach of the smudge effect. |
| Smudge Over | Determines how the smudge tool can work across various boundaries. |
| Select Form | Determines which elements in the texture project the tool will sample from. |