
Normals mode in the Surface shader module is used to simulate additional geometric detail on the surface of a 3D model, without a need to increase polygon count, by altering the way light interacts with a simple surface. A Normal Map input is used to generate the illusion of bumps, grooves, and fine details such as fabric texture, engraved patterns, or pores in skin.
Normal maps require an RGB texture, where the color channels encode the surface direction (X, Y, Z) which is used to inform the renderer the direction each point on the surface is facing (in tangent space, or object/world space). This information modifies the shading, giving the impression of more geometric complexity. Normal maps can be created in several ways:
- Bake Projects in Toolbag: Generate normal maps from a high-poly source model.
- Texture Projects in Toolbag: Paint or generate detail using Toolbag’s own texture painting system.
- Third-Party Applications: Author maps in external tools such as Substance Painter, Photoshop plugins, or other texture generators.
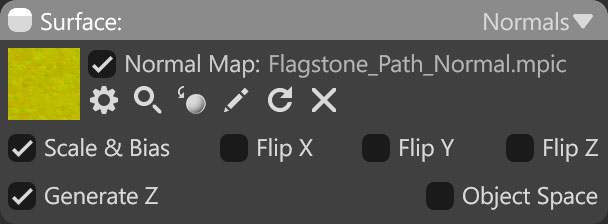
| Setting | Description |
|---|---|
| Normal Map Texture Slot | Add a normal map texture by clicking on the slot or dragging and dropping one from the Library. |
| Scale & Bias | Remaps vector data from the range [0,1] to [-1,1]. Disable this setting with floating-point textures. |
| Flip X, Y, Z | Inverts the content in the X, Y, Z axis or red channel of the texture. It can be useful if your texture map uses a different coordinate system. |
| Generate Z | Generates the normal’s Z coordinate from X and Y. This is generally useful for two-channel normal maps |
| Object Space | Determines whether the input normal map was baked in tangent or object/world space. Lighting errors will be seen if object space is enabled when using a tangent space map and vice versa. |